Create an agent workflow to monitor your productivity
Some friends and I recently built a tool to called Focus Coach Dobby to monitor your screen and alert you when you are distracted.
Here I'll document the core of the agent-part of Focus Coach Dobby to show how you could build a similar tool for yourself.
Overview
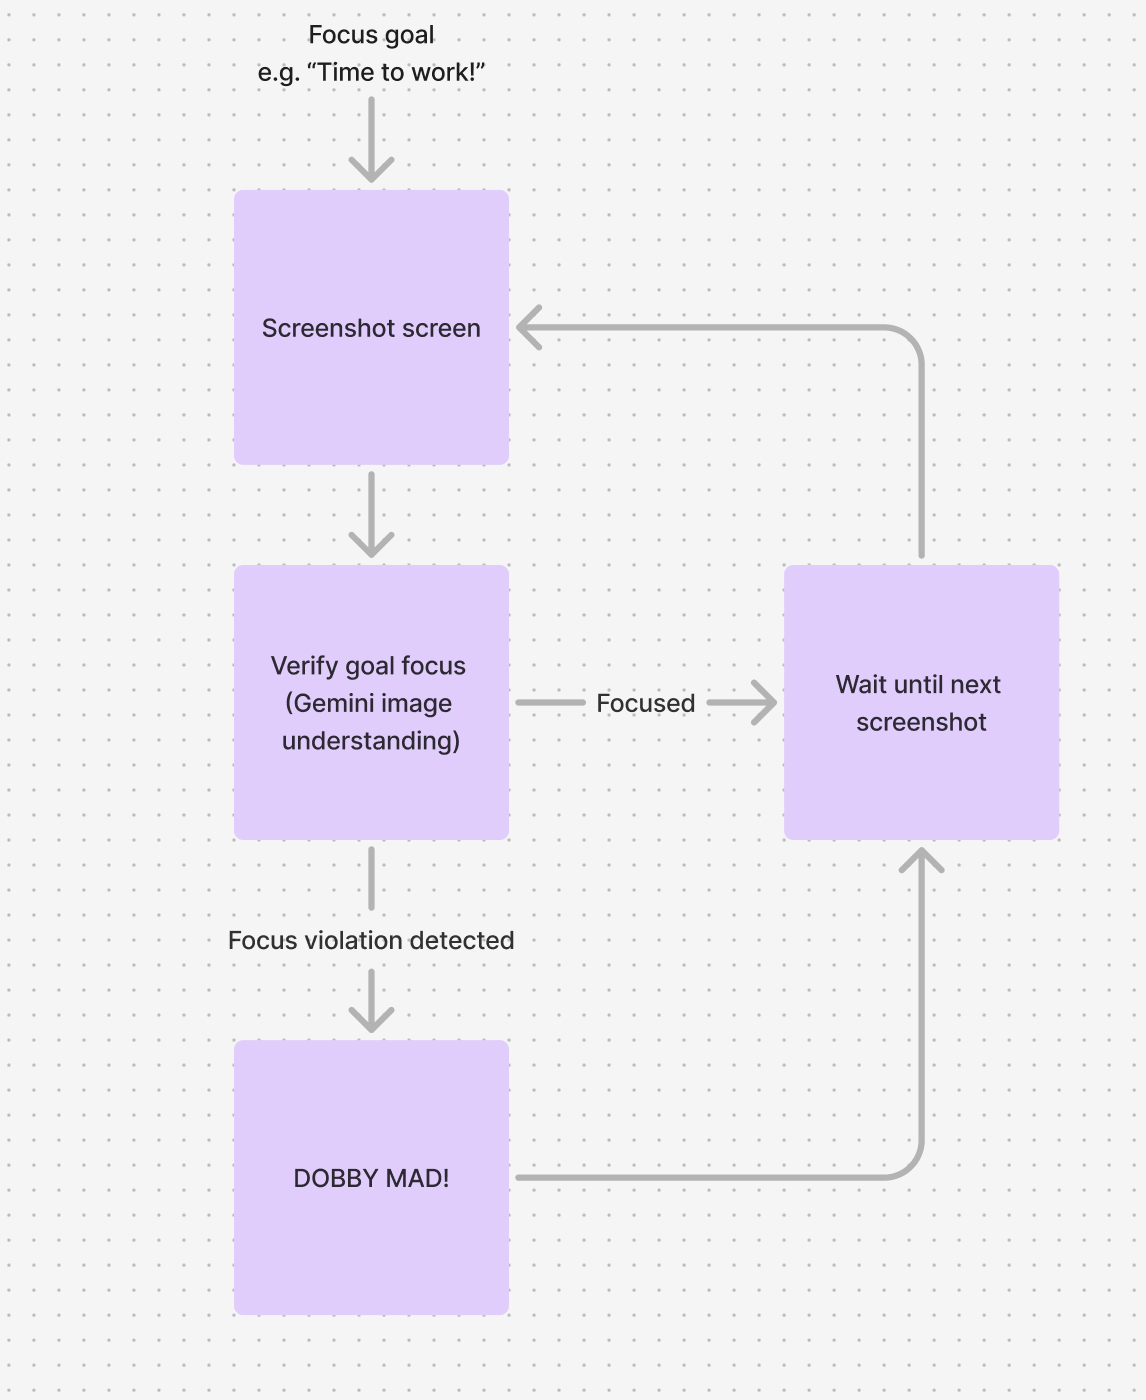
The agent is a simple workflow that:
- Takes a screenshot of the user's screen
- Asks Gemini to interpret the screenshot and determine if the user is distracted
- If the user is distracted, Dobby pops up a popup on the screen
- Once the popup is closed or no distraction is detected, the agent waits a bit before starting again
Taking screenshots
Here's the Electron code to capture screenshots:
const createScreenshot = async (): Promise<string> => {
  // Ensure screenshots directory exists
  const screenshotsDir = path.join(__dirname, `./screenshots`);
  if (!existsSync(screenshotsDir)) {
    mkdirSync(screenshotsDir, { recursive: true });
  }

  // Get primary display info
  const primaryDisplay = screen.getPrimaryDisplay();
  const { width, height } = primaryDisplay.size;
  const scaleFactor = primaryDisplay.scaleFactor;

  // Get screen sources
  const sources = await desktopCapturer.getSources({
    types: [`screen`],
    thumbnailSize: {
      width: width * scaleFactor,
      height: height * scaleFactor,
    },
  });

  const primaryScreenSource = sources[0];
  if (!primaryScreenSource) {
    throw new Error(`Unable to find primary screen source.`);
  }

  // Get screenshot as base64 PNG
  const screenshot = primaryScreenSource.thumbnail.toDataURL();
  const screenshotBuffer = Buffer.from(screenshot.split(`,`)[1], `base64`);

  // Generate unique filename with timestamp
  const timestamp = new Date().toISOString().replace(/[:.]/g, `-`);
  const screenshotPath = path.join(
    screenshotsDir,
    `screenshot-${timestamp}.png`
  );

  await new Promise<void>((resolve, reject) => {
    writeFile(screenshotPath, screenshotBuffer, (err) => {
      if (err) reject(err);
      resolve();
    });
  });

  return screenshotPath;
};
To capture screenshots in our Electron-based application, we use a combination of Electron's built-in APIs. Here's a breakdown of the process:
- We use the
desktopCapturerAPI to get sources of type "screen". - We retrieve the primary display information using
screen.getPrimaryDisplay(). - We capture the screenshot as a thumbnail and convert it to a base64-encoded PNG.
- Finally, we save the screenshot to a file with a timestamp in the filename.
Note that this implementation is specific to Electron. If you're using a different framework or platform, you'll need to use the appropriate APIs for capturing screenshots. For example:
- In a web browser, you might use the
navigator.mediaDevices.getDisplayMedia()API. - On desktop applications, you could use platform-specific libraries like
pyautoguifor Python orjava.awt.Robotfor Java. - For mobile apps, you'd use platform-specific APIs like
UIGraphicsBeginImageContextWithOptionsfor iOS orPixelCopyfor Android.
Regardless of the platform, the general idea remains the same: capture the screen content, process it if necessary, and save it to a file or keep it in memory for further processing.
Gemini screen understanding
Once we have the screenshot, we can use Gemini to analyze it and determine if the user is distracted. First, we initialize the Gemini client and model:
const client = new GoogleGenerativeAI(env.GOOGLE_API_KEY)
const model = client.getGenerativeModel({
        model: `gemini-2.0-flash-exp`, // Updated to Gemini 2.0 model
      });
We then define a schema that specifies the structure we want Gemini to return. This helps ensure we get consistent, well-structured responses:
const schema = {
   description: "Result",
   type: SchemaType.OBJECT,
   properties: {
       isDistracted: { type: SchemaType.BOOLEAN, nullable: false },
       distractionDescription: { type: SchemaType.STRING, nullable: false },
   },
   required: ["isDistracted", "distractionDescription"],
};
With the schema defined, we can call the model with our screenshot. We pass both a text prompt and the image data:
const result = await model.generateContent({
    generationConfig: {
        responseMimeType: "application/json",
        responseSchema: schema,
    },
    contents: [
        {
        role: `user`,
        parts: [
            { text: prompt },
            {
            inlineData: {
                mimeType: `image/png`,
                data: resizedImageBuffer.toString(`base64`),
            },
            },
        ],
        },
    ],
    });
Finally, we use Zod to parse and validate the response, ensuring we get the exact structure we expect:
const DistractionResponseSchema = z.object({
   isDistracted: z.boolean(),
   distractionDescription: z.string(),
});
const fullResponseText = result.response.text();
const response = z
   .object({
     isDistracted: z.boolean(),
     distractionDescription: z.string(),
   })
   .parse(JSON.parse(fullResponseText));

// Log the parsed response
return response;
Piecing it together with Llamaindex workflows
Now let's see how we can combine all these pieces by defining a workflow with Llamaindex workflows.
1. Context Definition
A Context type defines data accessible throughout the entire workflow:
type Context = {
  focusObjective: string;
};
2. Event Definitions
We also want to define events that extend the WorkflowEvent class. These events are emitted
by workflow steps, either in the step's return value or by emitting an event during step execution:
export class SleepCompleteEvent extends WorkflowEvent<EmptyObject> {}
export class ScreenshotEvent extends WorkflowEvent<{ filePath: string }> {}
export class FocusViolationEvent extends WorkflowEvent<{
  violationDescription: string;
}> {}
export class FocusVerifiedEvent extends WorkflowEvent<EmptyObject> {}
export class FocusViolationAcknowledgedEvent extends WorkflowEvent<EmptyObject> {}
3. Workflow Step Definitions
Then we need to define each step. Each step is an async function that houses our business logic:
// Sleep Step: Introduces a delay between focus checks
const sleepUntilNextFocusCheck = async (
  _ctx: HandlerContext<Context>,
  ev: StartEvent<string> | FocusVerifiedEvent | FocusViolationAcknowledgedEvent
): Promise<SleepCompleteEvent> => {
  if (!(ev instanceof StartEvent)) {
    await new Promise((resolve) => setTimeout(resolve, 5000));
  }
  return new SleepCompleteEvent({});
};

// Screenshot Step: Captures the current screen state
const screenshotUserScreen = async (
  _: unknown,
  _ev: SleepCompleteEvent
): Promise<ScreenshotEvent> => {
  const screenshotPath = await createScreenshot();
  return new ScreenshotEvent({ filePath: screenshotPath });
};

// Focus Verification Step: Analyzes screenshot for focus violations
const verifyFocus = async (
  ctx: HandlerContext<Context>,
  ev: ScreenshotEvent
): Promise<FocusVerifiedEvent | FocusViolationEvent> => {
  // The Google Gemini logic from the section above is housed in this ScreenshotProcessor class
  const screenshotProcessor = new ScreenshotProcessor();
  const result = await screenshotProcessor.processScreenshot(
    ctx.data.focusObjective,
    ev.data.filePath
  );

  if (result.isDistracted) {
    return new FocusViolationEvent({
      violationDescription: result.distractionDescription,
    });
  } else {
    return new FocusVerifiedEvent({});
  }
};

// Focus Violation Handler Step: Responds to detected focus violations
const handleFocusViolation = async (
  ctx: HandlerContext<Context>,
  ev: FocusViolationEvent
): Promise<FocusVerifiedEvent> => {
  // Here you can implement your own handling of the focus violation

  // For this example, we'll just acknowledge it immediately
  return new FocusVerifiedEvent({});
};
4. Workflow Configuration
Finally, we create a Workflow instance and configure it with our steps:
const focusCoachWorkflow = new Workflow<Context, string, string>({
  verbose: true,
});

// Add workflow steps
focusCoachWorkflow.addStep(
  {
    inputs: [
      WorkflowEvent.or(
        WorkflowEvent.or(StartEvent<string>, FocusVerifiedEvent),
        FocusViolationAcknowledgedEvent
      ),
    ],
    outputs: [SleepCompleteEvent],
  },
  sleepUntilNextFocusCheck
);

focusCoachWorkflow.addStep(
  {
    inputs: [SleepCompleteEvent],
    outputs: [ScreenshotEvent],
  },
  screenshotUserScreen
);

focusCoachWorkflow.addStep(
  {
    inputs: [ScreenshotEvent],
    outputs: [FocusVerifiedEvent, FocusViolationEvent],
  },
  verifyFocus
);

focusCoachWorkflow.addStep(
  {
    inputs: [FocusViolationEvent],
    outputs: [FocusVerifiedEvent],
  },
  handleFocusViolation
);
This workflow implementation creates a continuous loop that:
- Waits for a specified duration (
sleepUntilNextFocusCheck) - Takes a screenshot of the user's screen (
screenshotUserScreen) - Analyzes the screenshot to verify focus (
verifyFocus) - If a focus violation is detected, handles it appropriately (
handleFocusViolation)
The workflow uses events to manage state transitions and ensure proper sequencing of operations. Connections between steps are implied by their input/output events. If one step emits an event that matches another step's input, that step will execute.
You can customize the handleFocusViolation step to implement your own response to focus violations, such as showing notifications, logging to analytics, or triggering other actions.
And that's the core of how to build an app like Focus Coach Dobby! If you want to see the code for the app I built, it's published on GitHub here.
And feel free to connect with me on Twitter if you want to chat.